TradingView Link → MetaTrader 4 / 5 Documentation
TradingView Link converts TradingView strategy alerts into live orders on MetaTrader 4 and MetaTrader 5 using a webhook‑driven Expert Advisor (EA) installed on your trading platform.
TradingView strategy or manual alert → Webhook URL + alert message → TradingView Link server → MT4/MT5 EA executes, manages, or closes trades on your broker account.
- Open your MT4 or MT5 terminal and log in to the trading account you want to automate.
- Make sure the symbol you plan to trade (for example `BTCUSD` or `EURUSD`) is visible in Market Watch and is tradable.
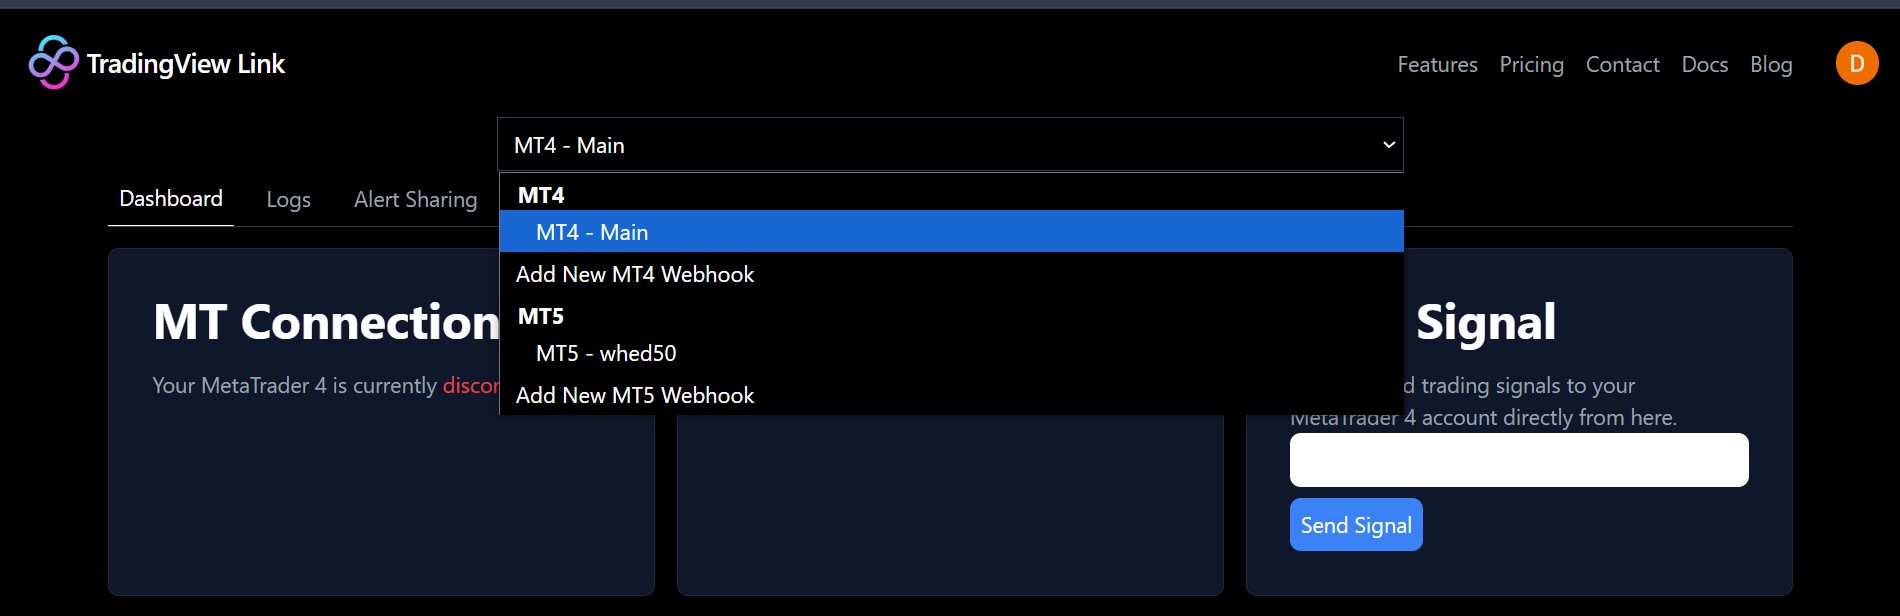
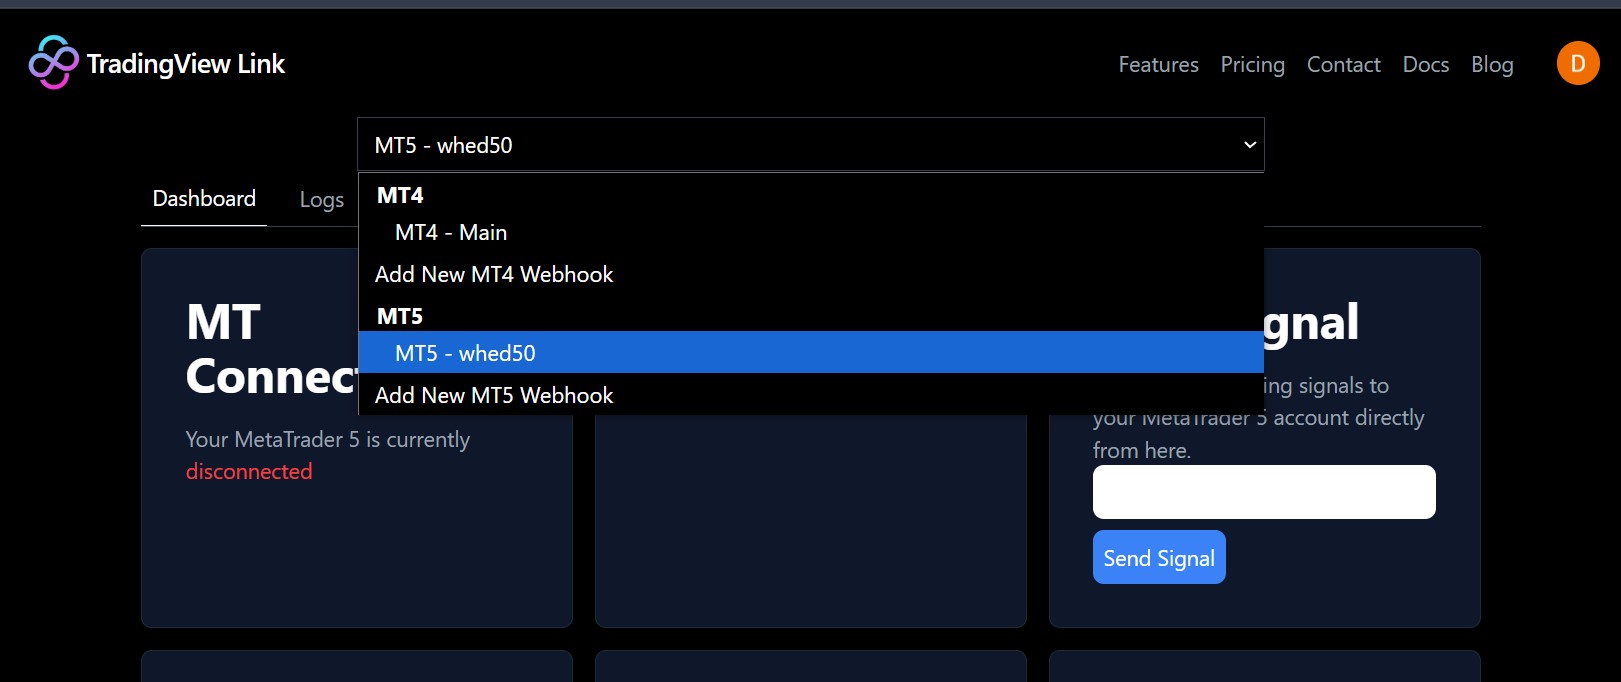
- Select or create one webhook dedicated to this MT4 or MT5 account.
- Copy its webhook URL and note the webhook ID that you will use inside the EA.
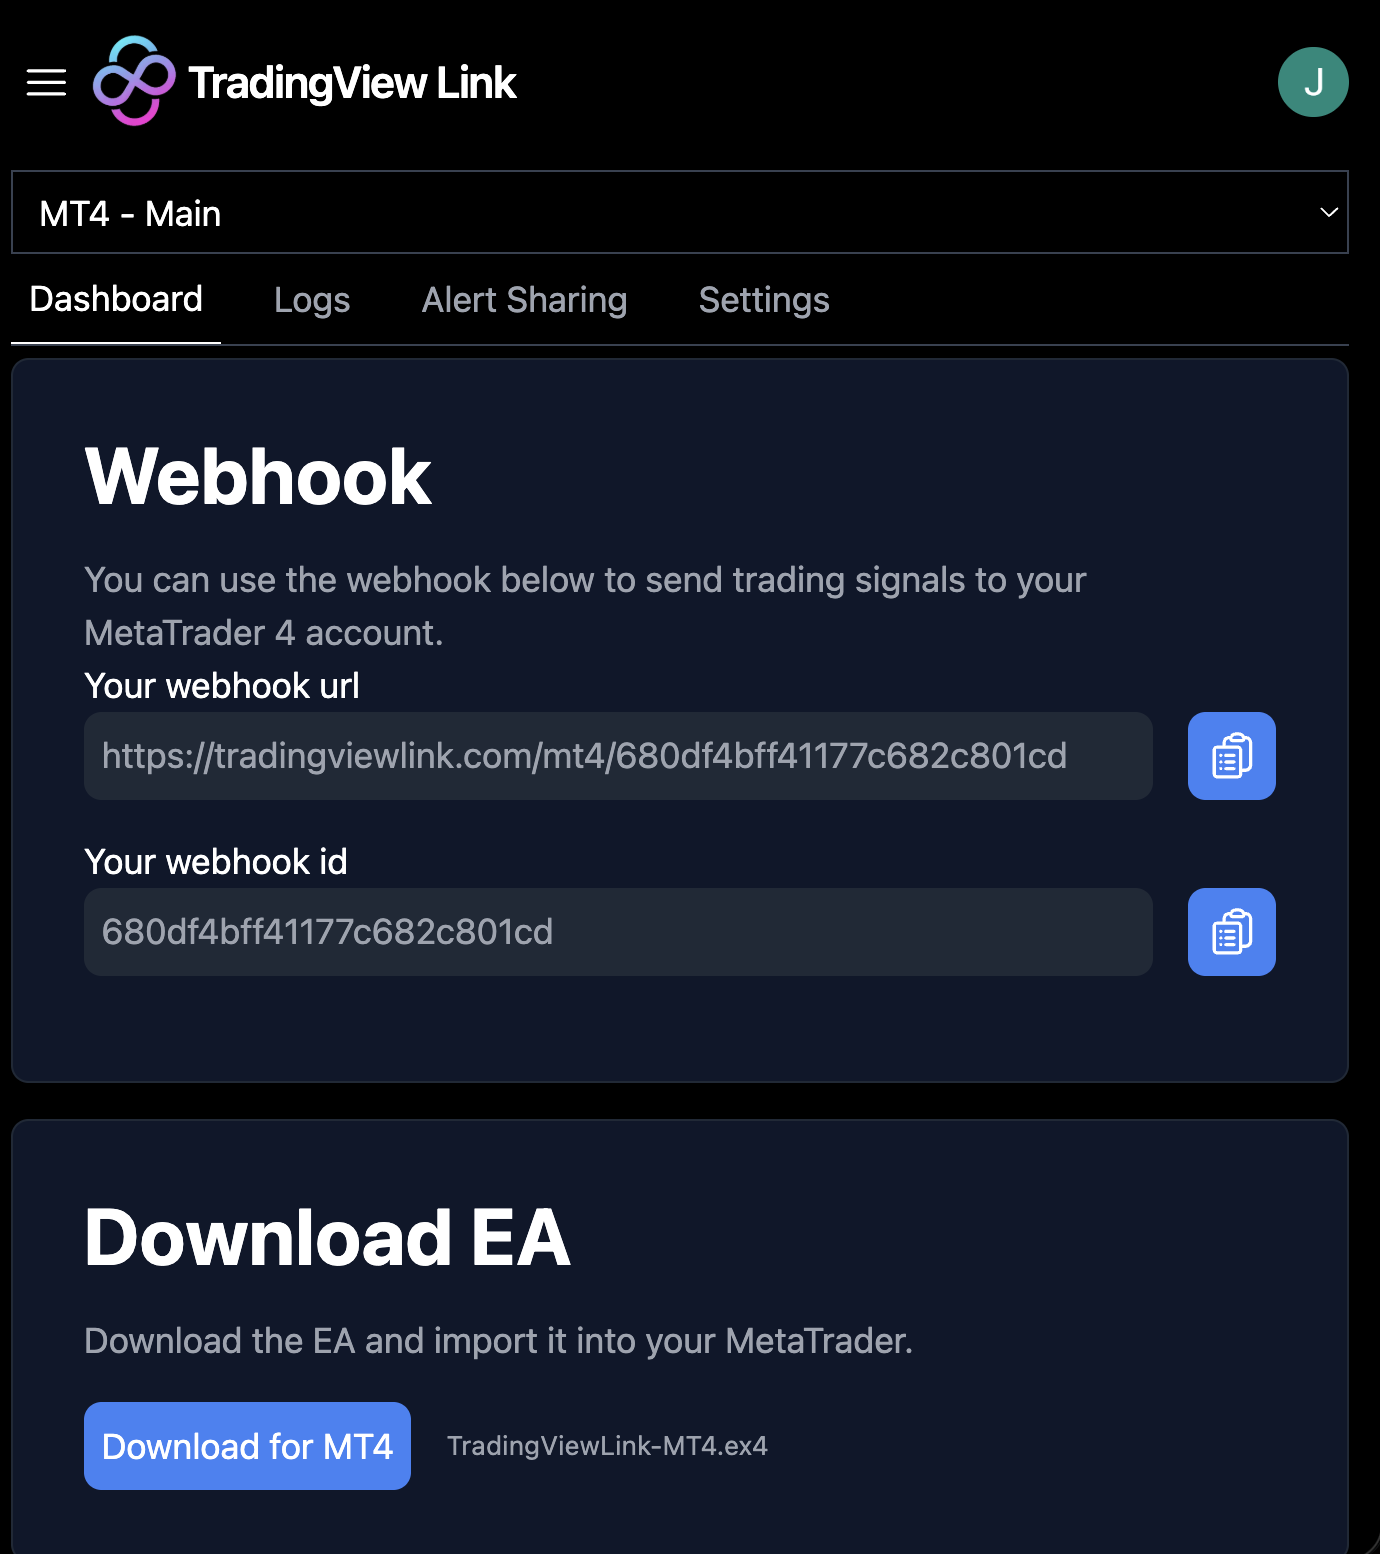
From the dashboard, open the “Download EA̶D; section and download the MT4 or MT5 EA file.
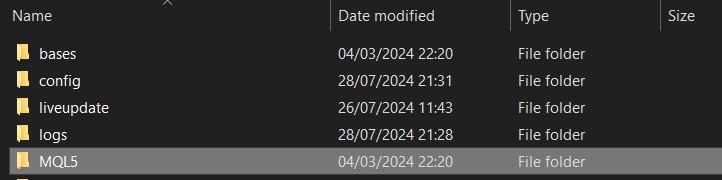
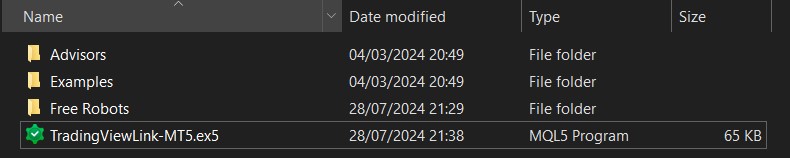
- Place the EA file into `MQL4/Experts` (MT4) or `MQL5/Experts` (MT5), then restart or refresh the Navigator.
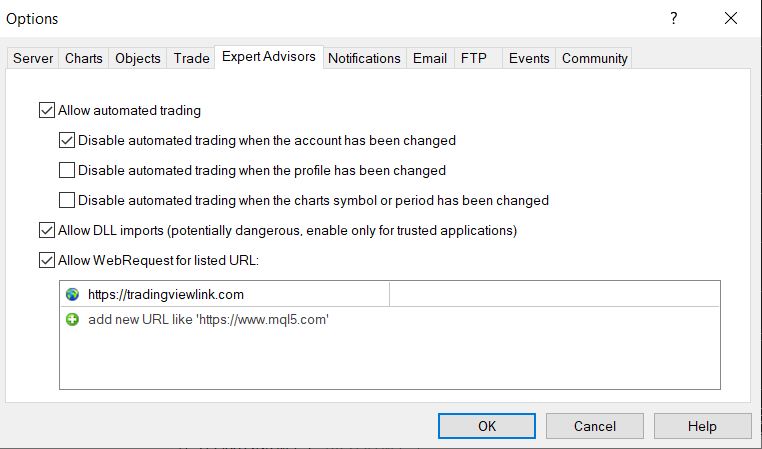
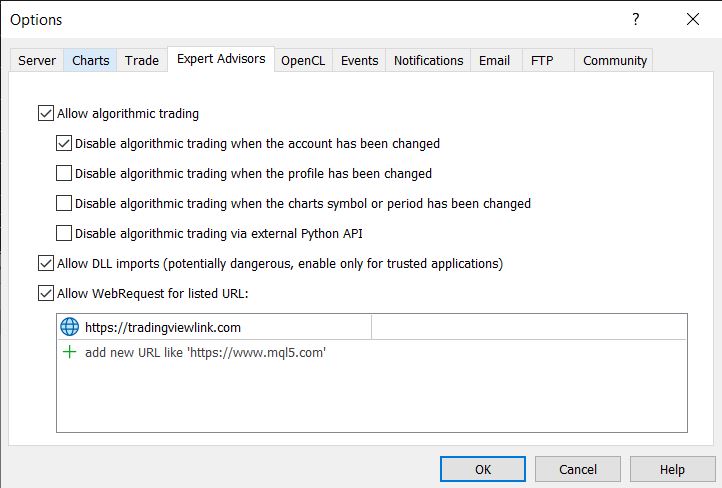
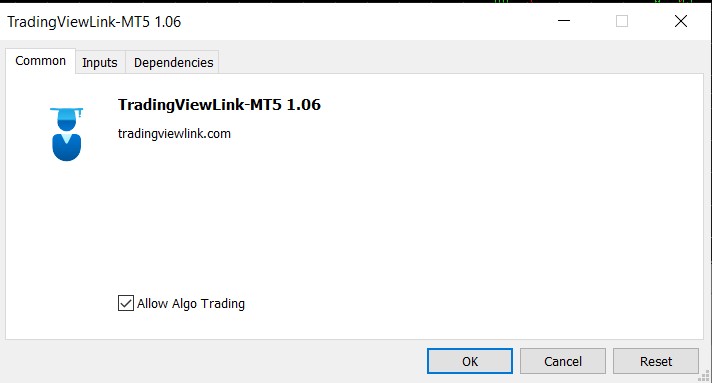
In Tools → Options, enable automated trading / algo trading and DLL imports.
- Add `https://tradingviewlink.com` to the WebRequest URLs allowed list.
- Ensure the AutoTrading / Algo Trading button is green.
- Drag the TradingView Link EA to a single chart and enable live/algo trading in the EA properties.
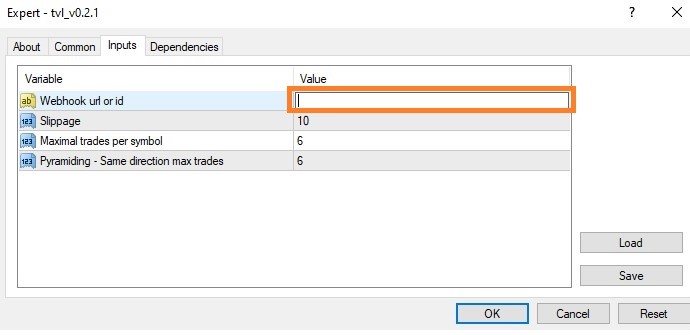
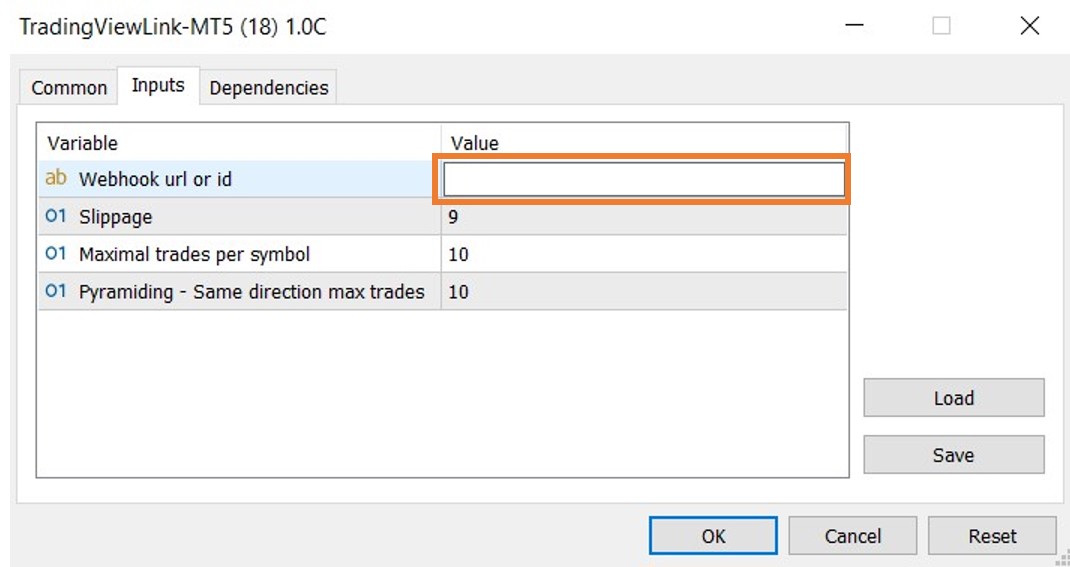
- Paste your webhook ID into the EA input field and keep other defaults unless you know what to change.
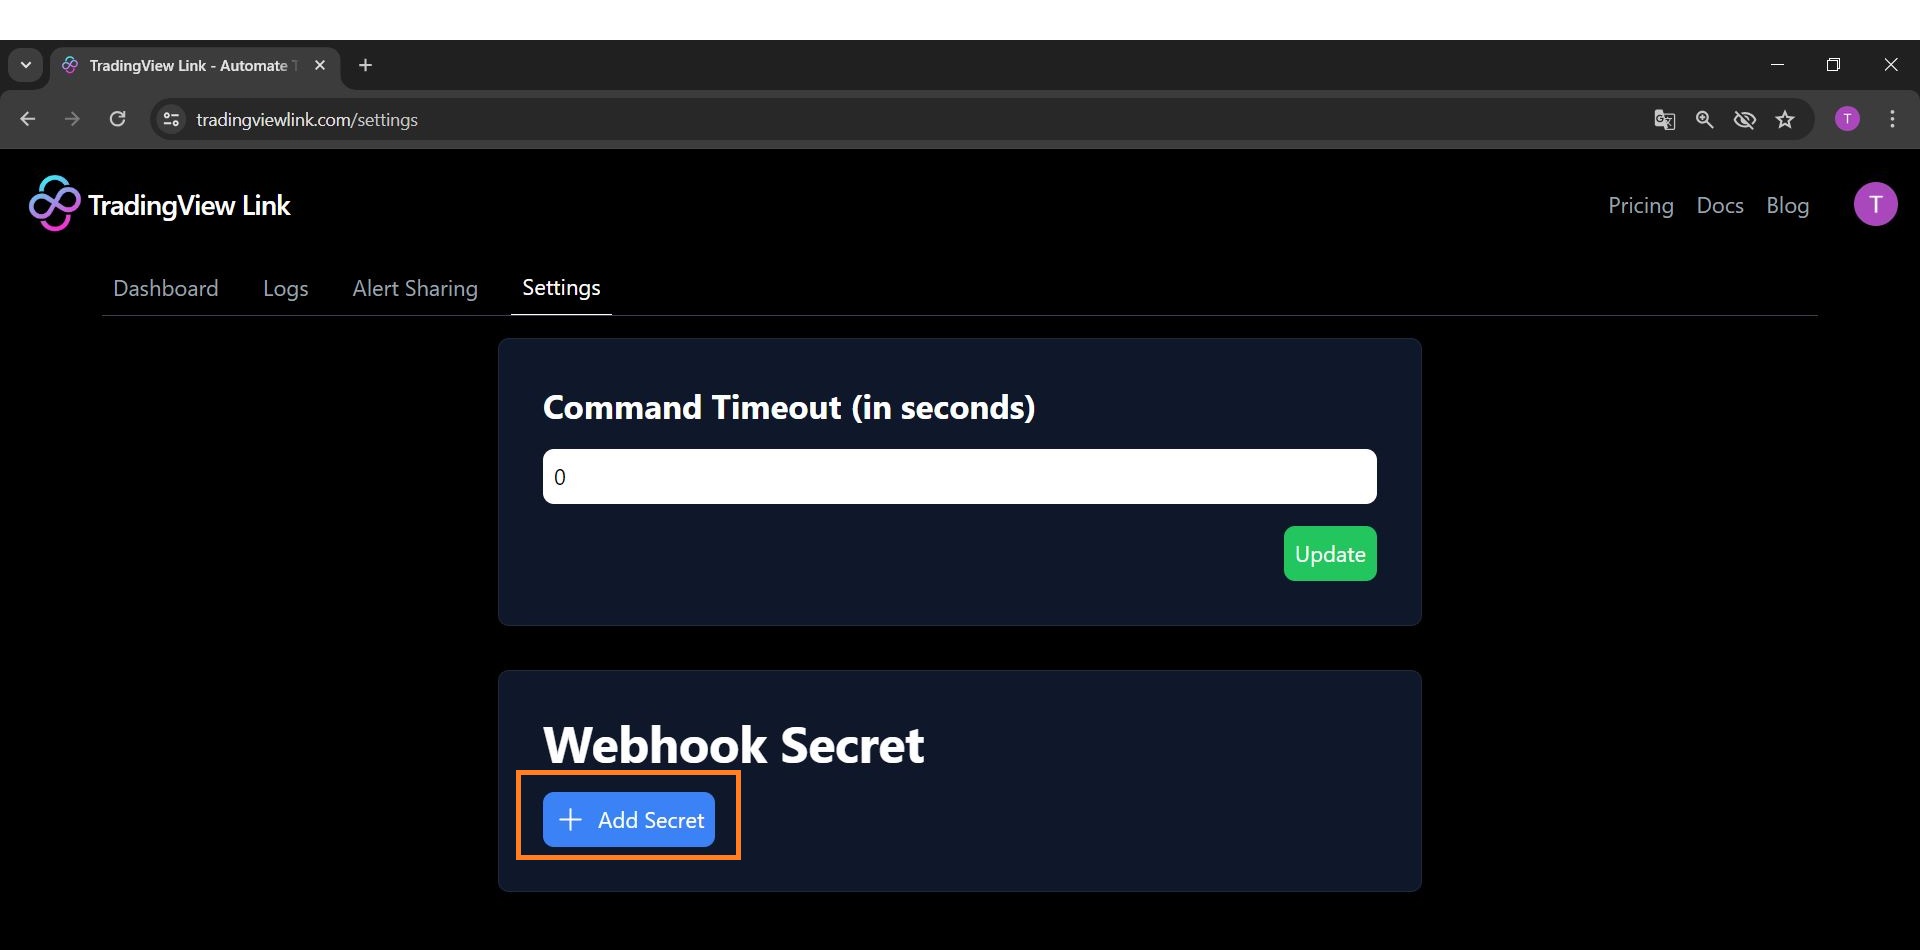
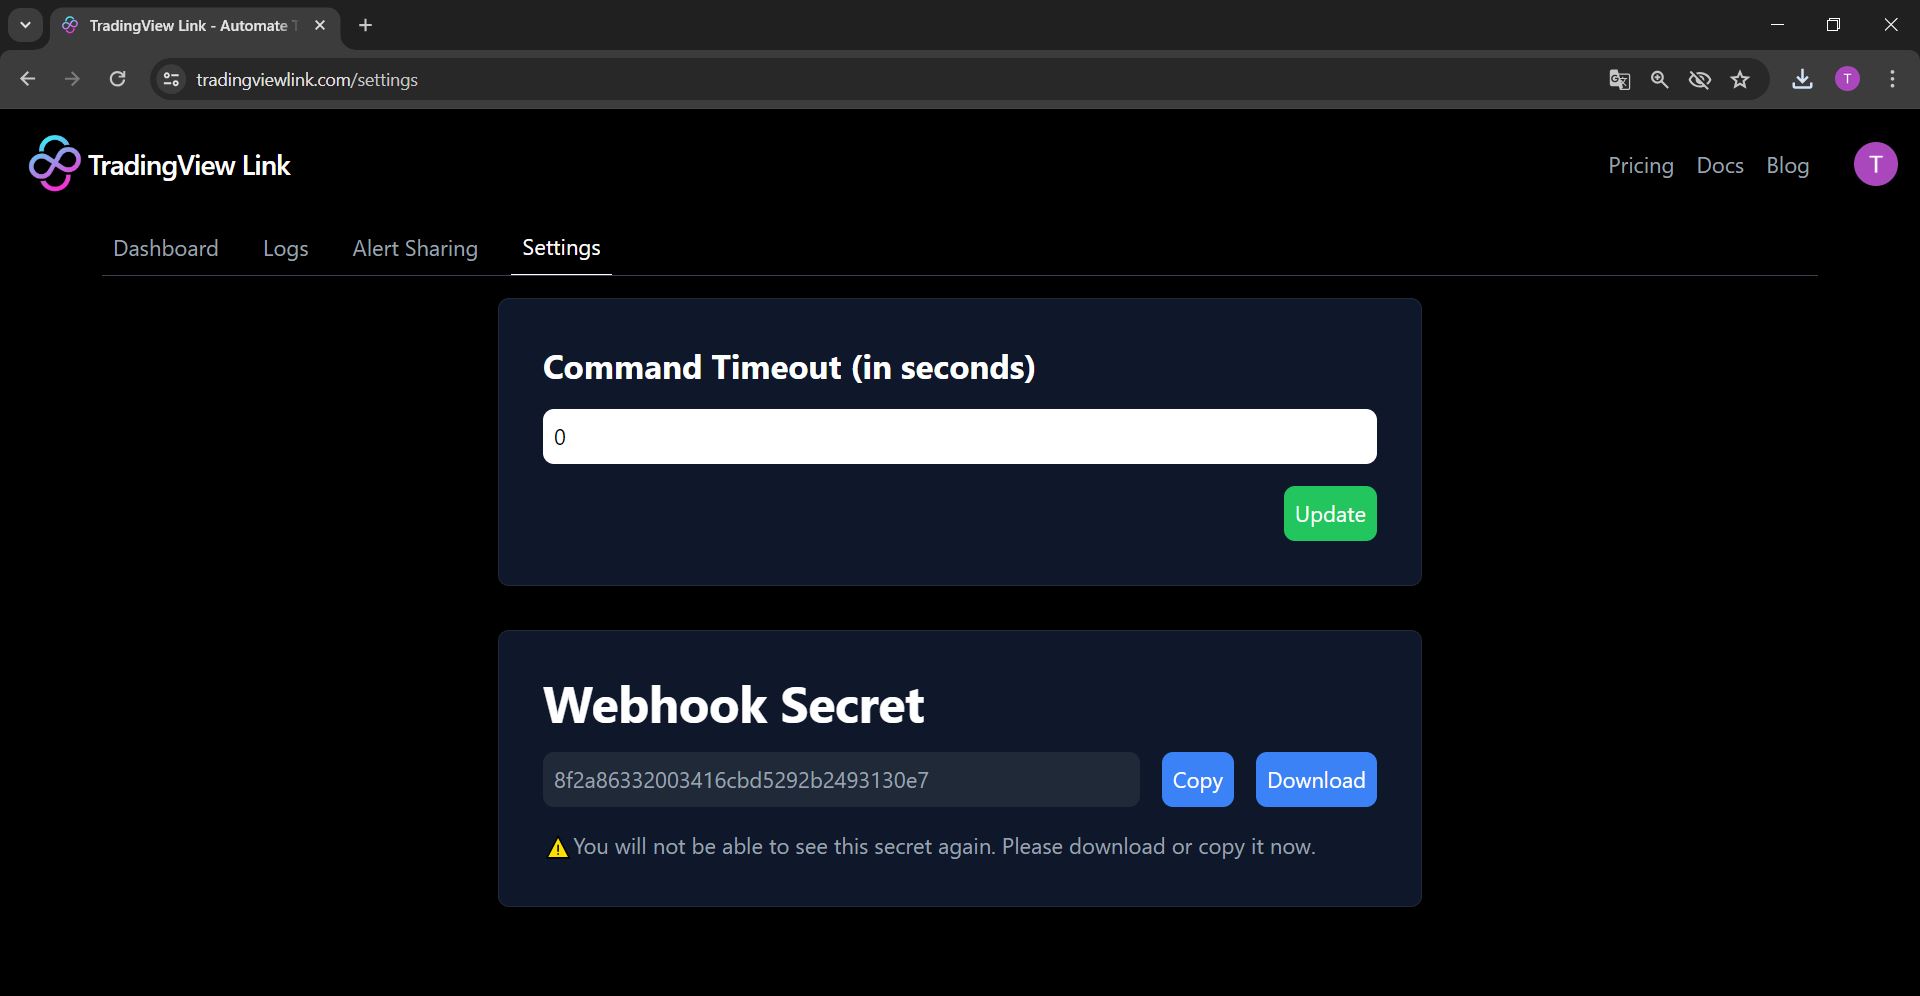
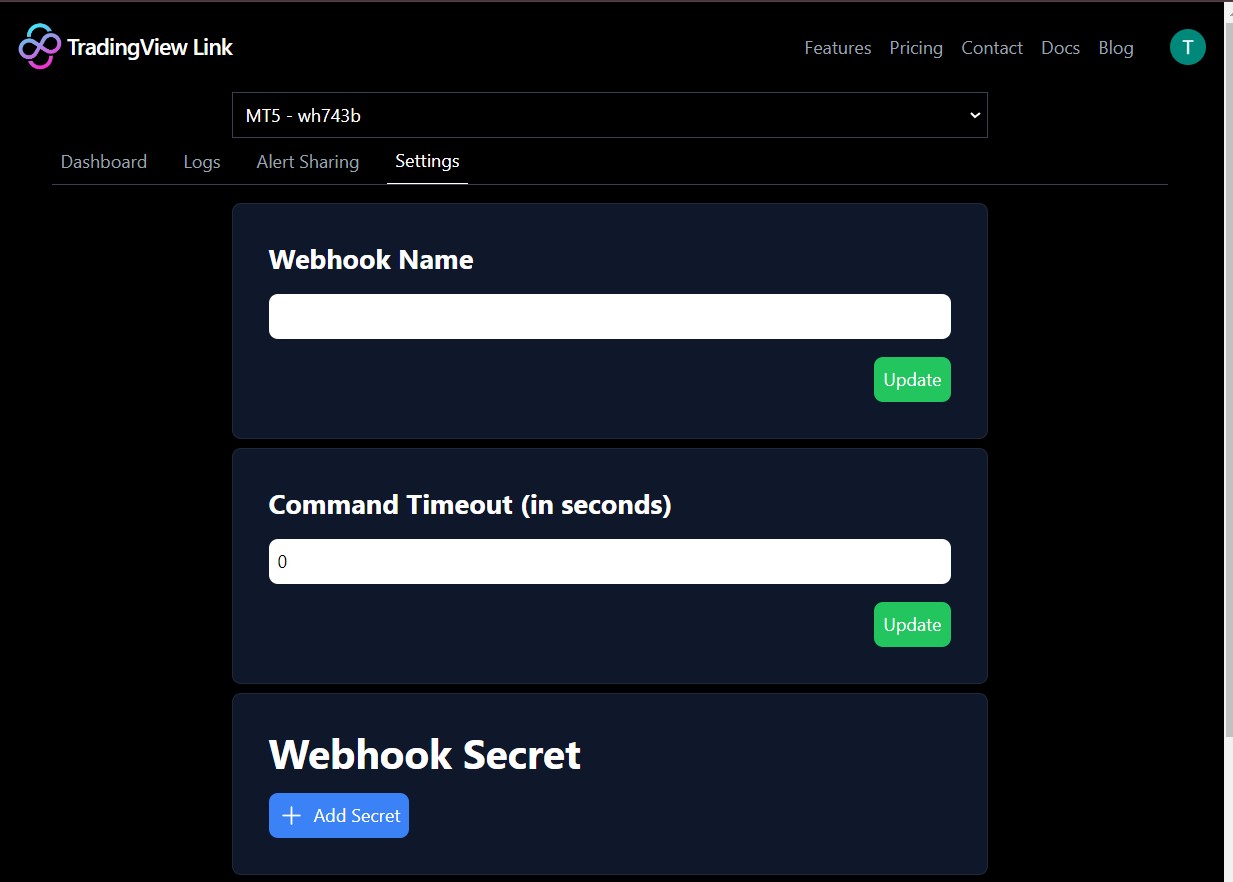
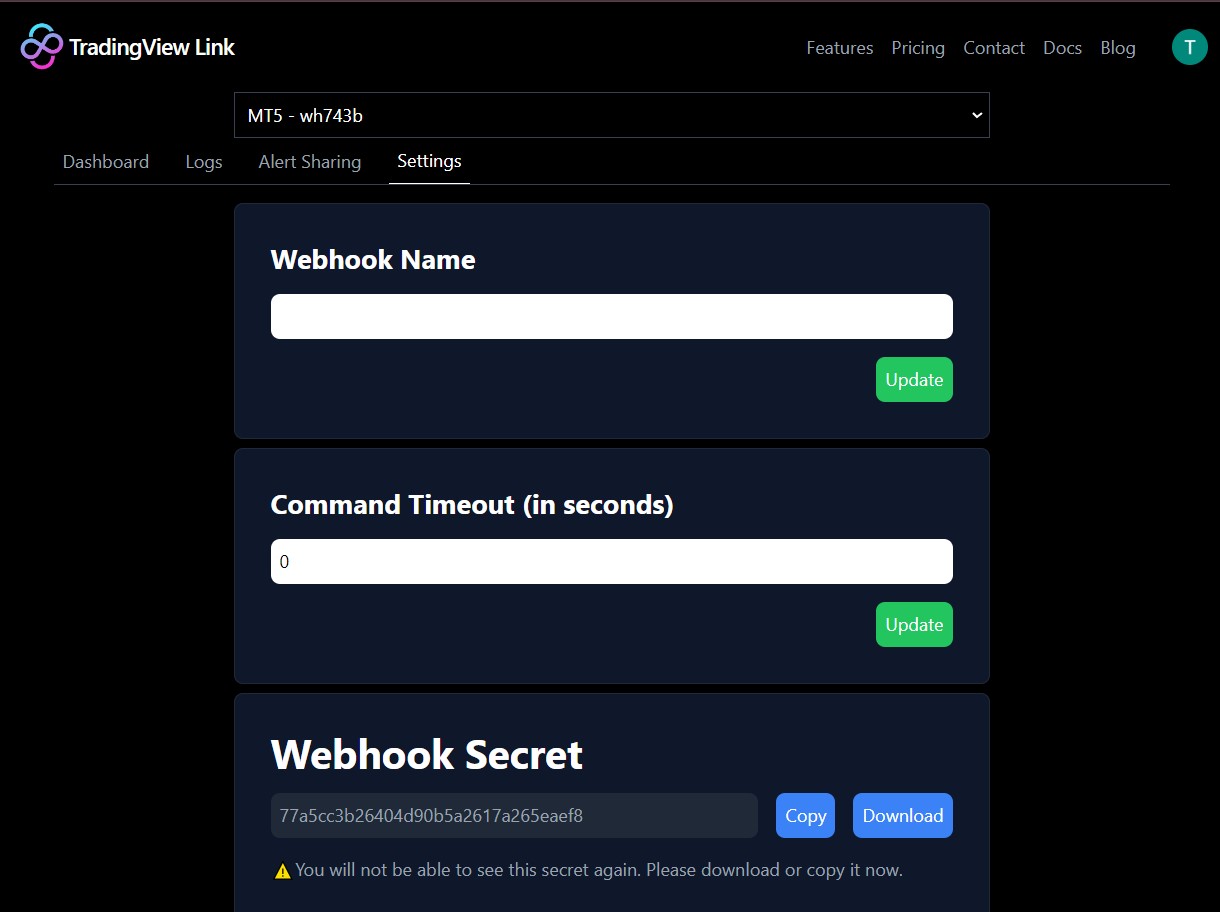
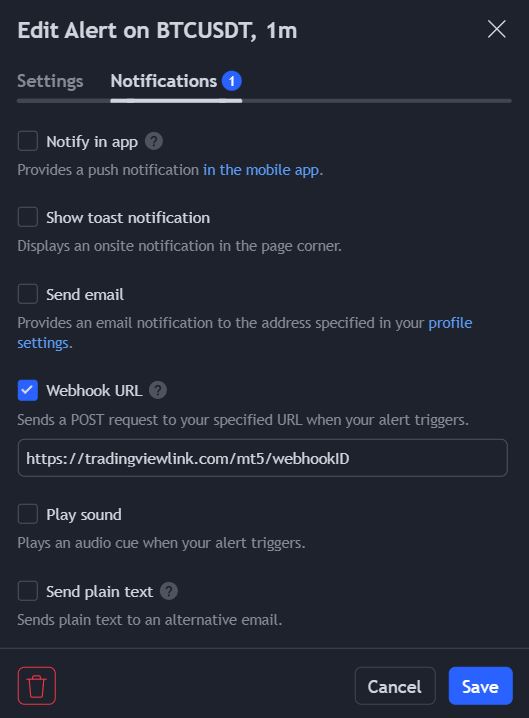
- In dashboard settings, click “Add Secret̶D; for this webhook to generate its unique password.
- Store the password safely; you will put it on the first line of every TradingView alert message.
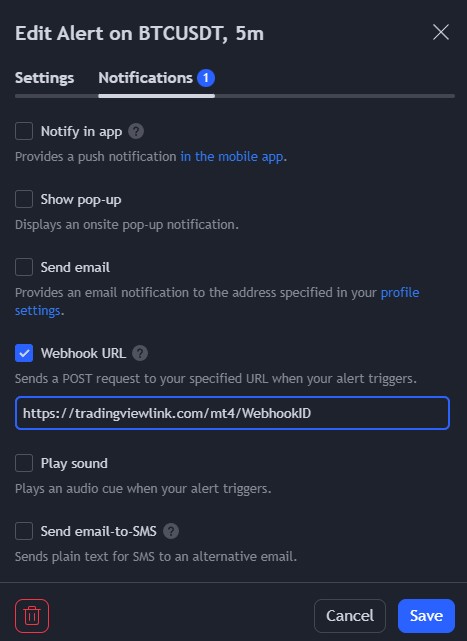
- In TradingView, create an alert and paste your webhook URL into the “Webhook URL̶D; field.
- Use a minimal message like in the syntax section below, then trigger the alert and confirm the order appears in MetaTrader.
| Term | Meaning | Where you use it |
|---|---|---|
| Webhook | Connection from TradingView to TradingView Link (URL + ID + secret password). | Configured in the dashboard and pasted into TradingView alerts. |
| Webhook ID | Identifier used in the EA inputs so it knows which webhook (and TradingView alerts) belong to this account. | Entered into EA input fields on MT4/MT5. |
| Webhook password (secret) | Unique secret that must appear on the first line of every alert message for that webhook. | Generated in the dashboard; placed in the alert message first line. |
| EA (Expert Advisor) | TradingView Link EA installed on MT4/MT5 that receives alerts from the server and executes trades. | Runs on a single chart per account; reacts to incoming alerts. |
| Shared target | Destination account used by Alert Sharing Pro to mirror alerts between MT4/MT5 accounts. | Configured in dashboard and referenced in EA inputs on receiving accounts. |
- In the dashboard, choose or create an MT4 webhook for this account and download the MT4 EA.
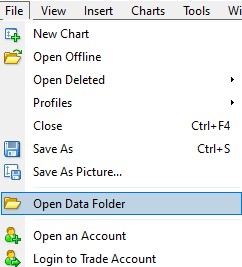
- In MT4, open `File → Open Data Folder`, go to `MQL4 → Experts`, and paste the EA, then restart or refresh the Navigator.
- In `Tools → Options`, enable automated trading and DLL imports, and add `https://tradingviewlink.com` to WebRequest URLs.
- Confirm AutoTrading is green and attach the EA to a single chart, enabling live trading in the EA properties.
- Enter your webhook ID into the EA input and save.
- Generate a webhook password in the dashboard under “Add Secret̶D; for this webhook.
- In TradingView, create an alert, paste the webhook URL, and use a minimal alert message as described in the syntax section.
- Select or create an MT5 webhook in the dashboard and download the MT5 EA.
- In MT5, use `File → Open Data Folder`, then open `MQL5 → Experts` and paste the EA, then restart or refresh Navigator.
- In `Tools → Options`, enable algorithmic trading and DLL imports, and add `https://tradingviewlink.com` to the WebRequest URL list.
- Ensure Algo Trading / AutoTrading is enabled (green), and attach the EA to a single chart.
- Enter your webhook ID into the EA inputs and keep other parameters default initially.
- Add a webhook password in the dashboard via “Add Secret̶D;.
- Configure TradingView alerts with the MT5 webhook URL and message syntax described below.
1. Install the TradingView Link EA on MT4
In the TradingView Link dashboard, choose the MT4 webhook that will control this MT4 trading account.
On the Dashboard page, open the “Download EA̶D; section and click “Download̶D; to get the MT4 EA file.
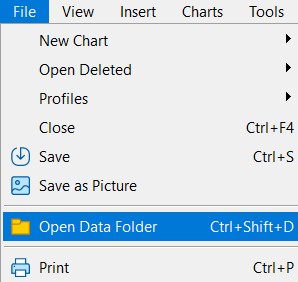
In MT4, click File → Open Data Folder to open the platform data directory, then go into `MQL4 → Experts` and copy the downloaded EA file into this folder.
Close and reopen MT4, or refresh the Navigator, so the new EA appears in the Expert Advisors list.


2. Enable permissions and connectivity for MT4
Open Tools → Options, enable “Allow automated trading̶D; and “Allow DLL imports̶D;, then add `https://tradingviewlink.com` to the “Allow WebRequest for listed URL̶D; section.
This permission lets the MT4 EA communicate with the TradingView Link server and receive orders securely.
Verify that the AutoTrading button on the MT4 toolbar is green so that the EA is allowed to place and manage live trades.

3. Attach EA and link webhook on MT4
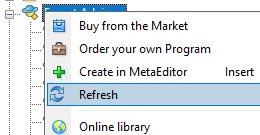
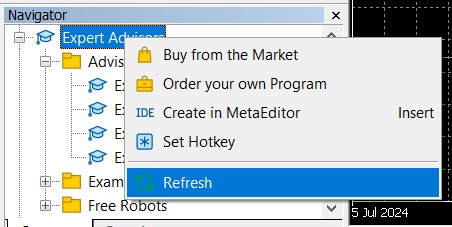
In the Navigator window, right‑click “Expert Advisors̶D; and choose “Refresh̶D; so that the TradingView Link EA appears in the list.
Attach only one instance of the EA to a single chart, and it will handle trades for all MT4 symbols on that account.
Drag the EA onto a chart, tick “Allow live trading̶D; and “Allow DLL imports̶D;, then enter your webhook ID from the TradingView Link dashboard into the ID field.
Keep the other inputs as recommended in the documentation or adjust them according to your execution preferences.

4. Secure the webhook and alerts for MT4
In the Dashboard settings, click “Add Secret̶D; to generate the webhook password that must precede every alert message for this webhook ID.
Save this password securely because it will not be displayed again; if you lose it, delete it and create a new one, then update your Telegram and TradingView alerts.
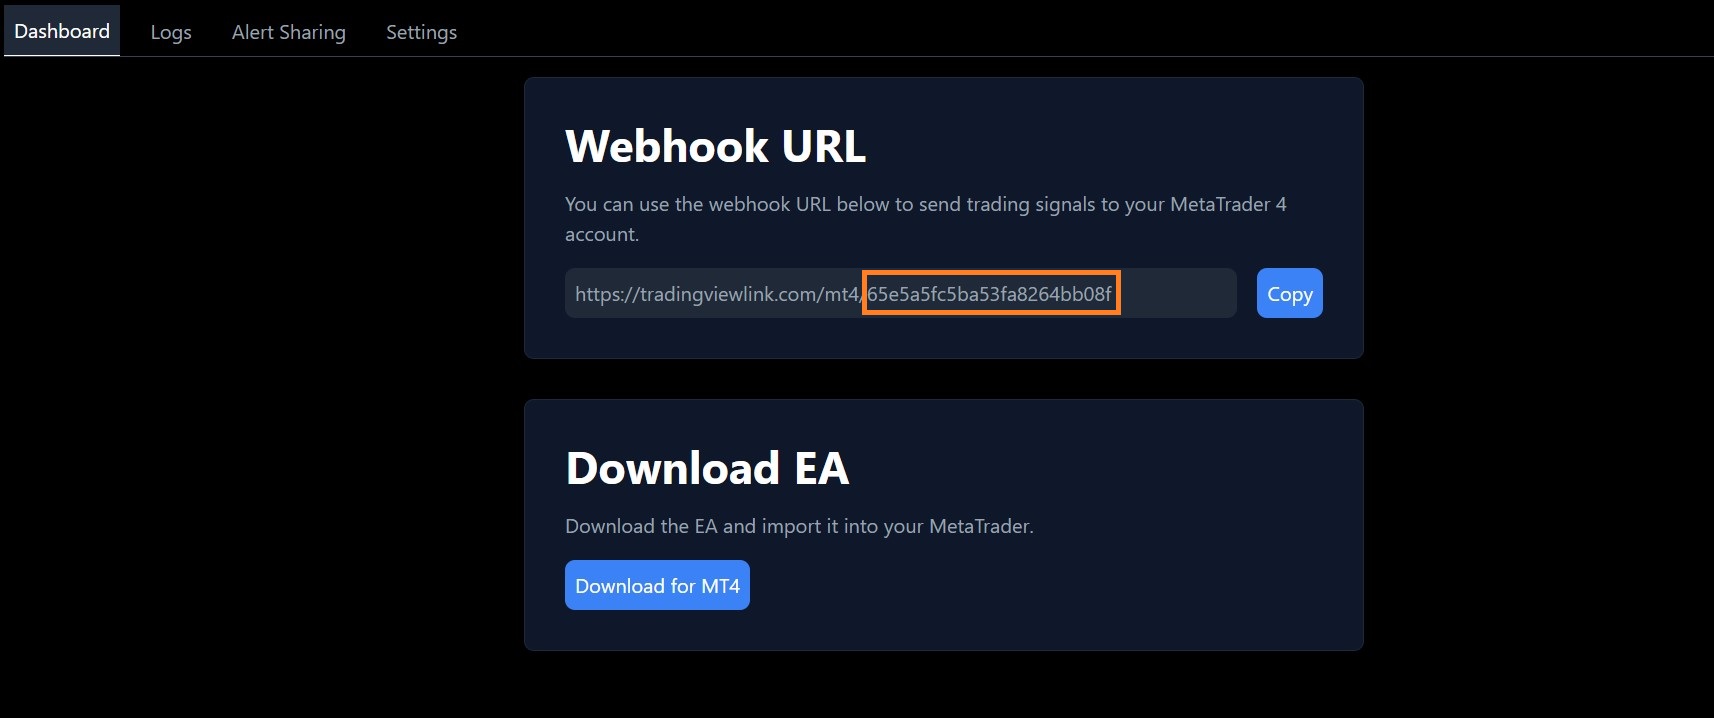
When creating a TradingView alert, paste the webhook URL from the dashboard into the “Webhook URL̶D; field and use the documented message syntax in the alert message box.
This connects your TradingView strategy directly to the MT4 EA via the TradingView Link server.
5. Optional ― Telegram & Alert Sharing for MT4
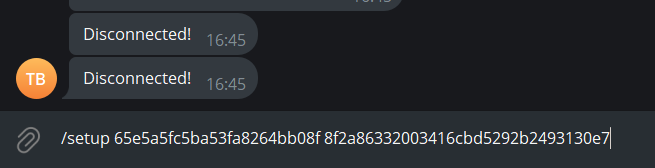
To monitor alerts and send instructions from Telegram, send the command `/setup WebhookID PasswordOfWebhookID` to the TradingView Link Telegram bot at https://t.me/tvbobo_bot.
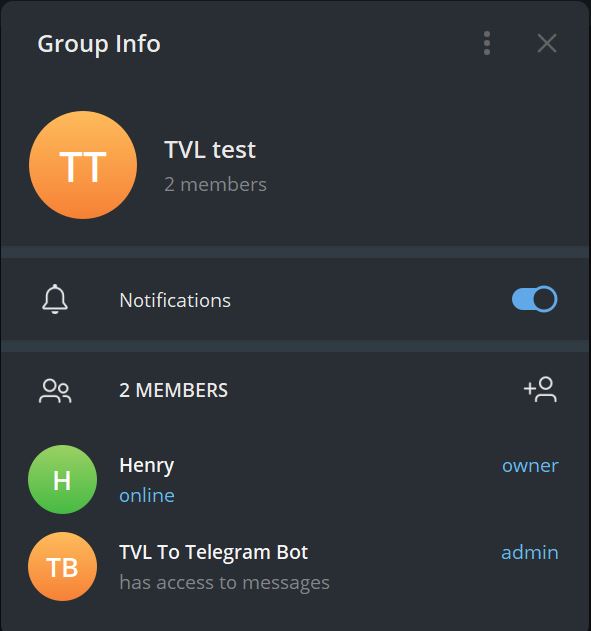
After the confirmation message, you can manage multiple webhooks by creating separate Telegram groups, adding the bot as an admin, and repeating the setup command in each group.


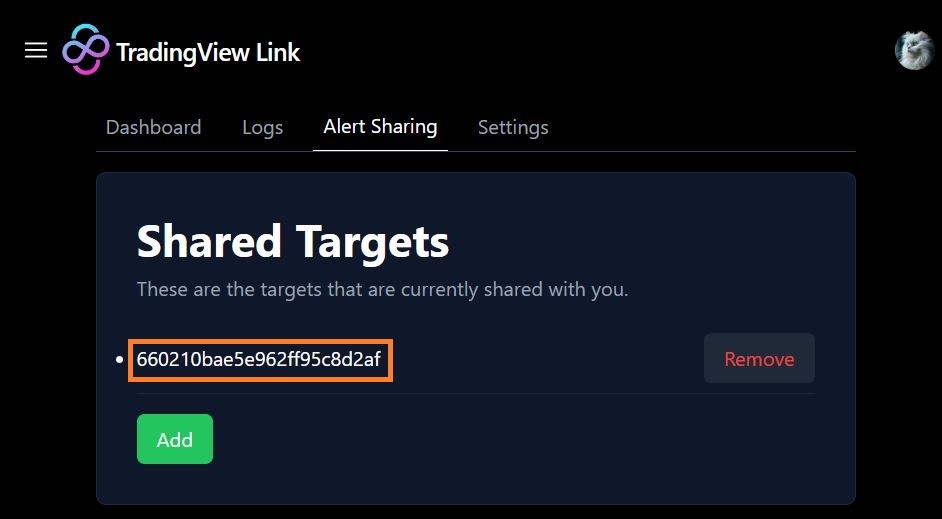
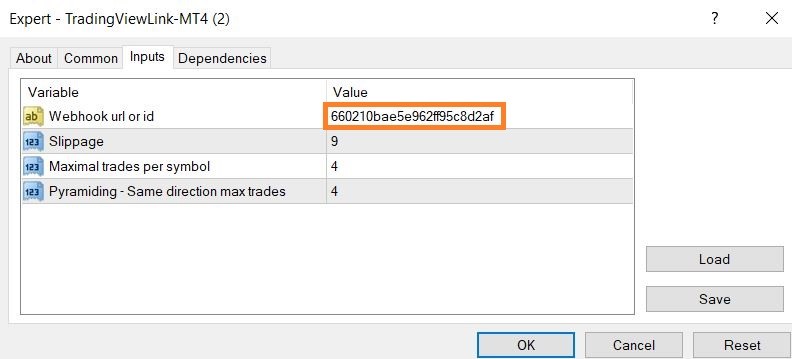
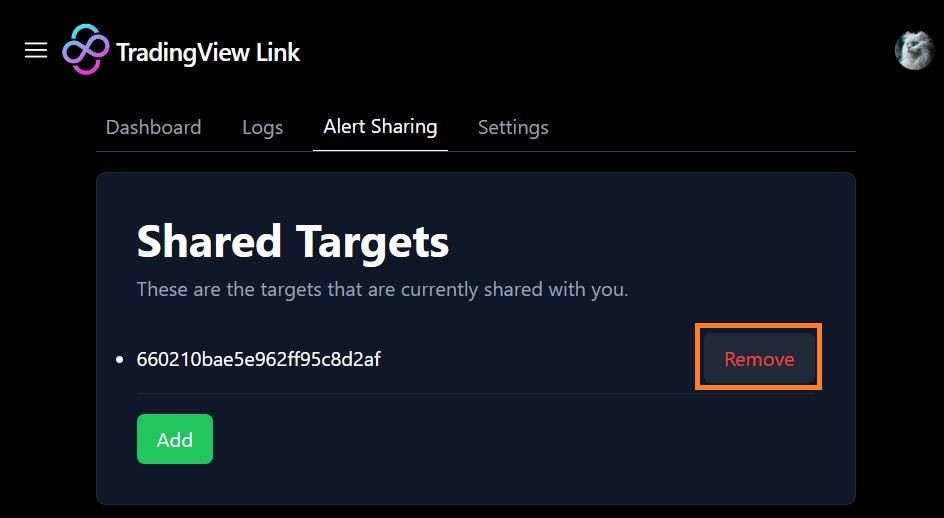
On the Pro plan, you can share alerts between MT4 and MT5 accounts by adding shared targets, then entering the shared target ID into the EA inputs of the receiving account.
Removing a shared target in the dashboard immediately stops forwarding alerts to that target account.


- Select or create an MT5 webhook in the dashboard and download the MT5 EA.
- In MT5, use `File → Open Data Folder`, then open `MQL5 → Experts` and paste the EA, then restart or refresh Navigator.
- In `Tools → Options`, enable algorithmic trading and DLL imports, and add `https://tradingviewlink.com` to the WebRequest URL list.
- Ensure Algo Trading / AutoTrading is enabled (green), and attach the EA to a single chart.
- Enter your webhook ID into the EA inputs and keep other parameters default initially.
- Add a webhook password in the dashboard via “Add Secret̶D;.
- Configure TradingView alerts with the MT5 webhook URL and message syntax described below.
1. Install the TradingView Link EA on MT5
In the TradingView Link dashboard, choose the MT5 webhook dedicated to the MT5 account you intend to automate.
Go to the “Download EA̶D; section in the dashboard and download the MT5 version of the TradingView Link EA.
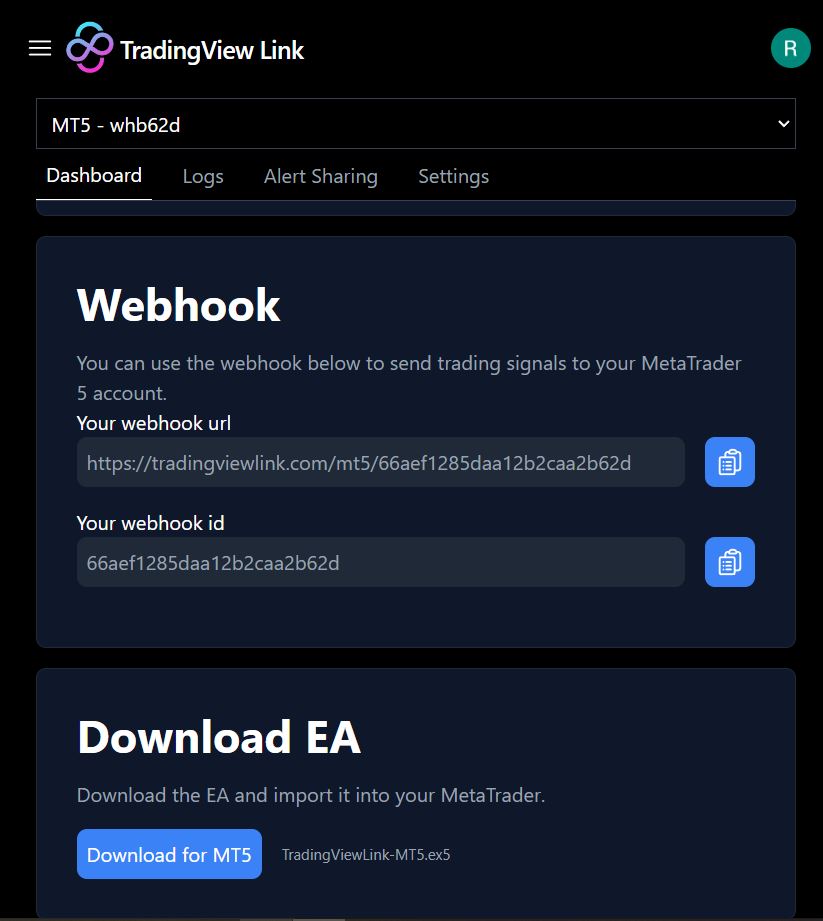
In MT5, click File → Open Data Folder, open `MQL5 → Experts`, and paste the downloaded EA file into this folder.
Restart MT5 or refresh the Navigator so the EA shows up in the Expert Advisors list.

2. Enable permissions and connectivity for MT5
In Tools → Options, enable algorithmic trading and DLL imports, then add `https://tradingviewlink.com` to the WebRequest URL list.
This allows the MT5 EA to communicate with the TradingView Link server for receiving and executing orders.
Confirm that the “Algo Trading̶D; or “AutoTrading̶D; button in MT5 is green, which authorizes the EA to send and manage orders.

3. Attach EA and symbols for MT5
Refresh the Expert Advisors list in the Navigator so the TradingView Link EA becomes visible, then drag it to one chart only to manage all symbols.
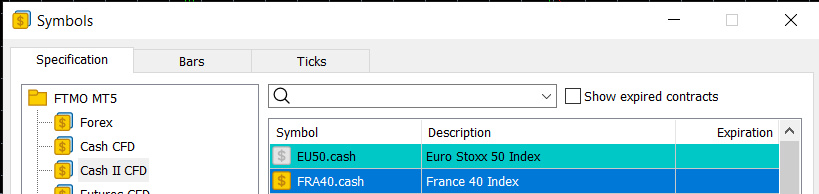
Ensure that every symbol you plan to trade appears in the Market Watch with a colored dollar sign, indicating it is active for trading.
Attach the EA to a chart, enable “Allow Algo Trading̶D;, and enter your TradingView Link webhook ID into the EA’s input settings.
Other parameters can be adjusted later using the EA documentation and your broker’s execution characteristics.
4. Secure webhook and alerts for MT5
From the Dashboard settings, click “Add Secret̶D; to generate the webhook password that will be required at the start of each alert message.
Keep this password somewhere safe, as changing it later will require updating both the Telegram bot configuration and your TradingView alerts.
In each TradingView alert that will trigger MT5 trades, paste the webhook URL from the dashboard into the alert’s webhook field and follow the message syntax described in this documentation.
5. Optional — Telegram & Alert Sharing for MT5
To monitor alerts and send instructions from Telegram, send the command `/setup WebhookID PasswordOfWebhookID` to the TradingView Link bot and wait for the confirmation.
You may configure multiple webhooks in a single Telegram account by creating separate groups, adding the bot as an administrator, and repeating the setup command in each group.
On the Pro plan, you can share alerts between MT5 accounts or between MT4 and MT5 by adding shared targets, then entering the shared target ID into the EA inputs of the receiving account.
Removing a shared target from the dashboard stops further alerts from being forwarded to that particular target account.
Alert messages are text blocks that start with your webhook password and then specify the action, symbol, quantity, and optional execution parameters that the EA will follow when placing or managing trades.
A sample TradingView strategy and an explainer video are available in the original documentation to demonstrate how alerts are generated and formatted before they reach the webhook.
Sample TradingView Strategy: https://www.tradingview.com/script/CZrGSc7m-test-signal-0303-tvl/
Mandatory components for TradingView Alerts
| Component | Parameter | Description |
|---|---|---|
| Password for Webhook ID | `Password` | Unique secret generated in the dashboard; it must appear on the first line of every alert message for that webhook. |
| Action | `long`, `short`, `flat`, `cancel`, `modify`, `{{strategy.market_position}}` | Determines whether the EA opens, closes, cancels, or modifies orders; strategies can send their current position via placeholders such as `{{strategy.market_position}}`. |
| Symbol | Example: `BTCUSD`, `US500`, `EURUSD` | Identifies which instrument in MetaTrader to trade; symbol names must match your broker’s naming. |
| Quantity | q | Order size in lots such as q=0.1; this can also be combined with `qt=percent` to derive size from account balance. |
Optional components for TradingView Alert Messages
| Parameter | Usage | Notes |
|---|---|---|
| Take Profit (tp, tpp) | Sets profit target in pips, price, or percentage relative to the entry, for example tp=300, tpp=2.19, or tp=3%. | Applicable to both market and limit orders depending on the context of the alert. |
| Stop Loss (sl, slp) | Defines loss limit in pips, price, or percentage, such as sl=300, slp=2.19, or sl=3%. | Can be updated later via the `modify` action in subsequent alerts. |
| Limit Price (p) | Provides the entry price or price offset for limit orders using pips, price, or percentage; in some MT5 cases negative values are used to express relative distance from current market price. | Becomes a required field when opening limit orders through alerts. |
| Magic Number (m) | Assigns a strategy ID so that multiple strategies can trade the same symbol without interfering with one another. | Works with both market and limit orders on MT4 and MT5. |
| Partial Close (cq) | Closes a percentage of all open lots when combined with a `flat` action, for example cq=30%. | Applies only to existing market positions and not to pending limit orders. |
| Expiry (e) | Specifies expiry time in minutes for pending limit orders so that they are automatically cancelled if not filled within the defined window. | Helps avoid stale limit orders remaining in the market after conditions change. |
| Trailing Stop (ts) | Activates a trailing stop feature, measured in pips, that moves the stop loss as the price moves favorably. | Example: `ts=1000`. |
| Trading Sessions (s) | Defines the active trading period by time and optionally day. The time zone follows the broker server time. | Examples: `s=14:30-19:00` or `s=5=14:30-15:00` (Friday). Supports multiple sessions separated by commas: `s=14:30-15:00,15:30-16:15`. |
| Trading Range (r) | Defines specific price range to execute trades for that range only. | Example: `r=6000-7000`. This range identifies the allowed price interval for trade entry. |
Base syntax for TradingView Link Alerts
Place the webhook password on its own line, followed by a line describing the trade instruction in this order: action, symbol, quantity, and any optional settings such as TP, SL, limit price, or magic number.
PasswordForWebhook
Action Symbol q=... [optional parameters]
PasswordForWebhook
long BTCUSD q=0.1 sl=1000 tp=300
Section 1 – Market orders via TradingView Link
To open a market order, include the password, then send a line with `long` or `short`, symbol, and q= size; the EA will execute immediately at current market price subject to slippage settings.
TradingView strategies can pass `{{strategy.market_position}}` instead of a fixed action so that “long̶D;, “short̶D;, and “flat̶D; states are translated directly into EA behavior.
PasswordForWebhook
{{strategy.order.action}} BTCUSD q=0.06 slp=40000 tp=1000
To size by balance, you can use `qt=percent` with q= and repeat the instruction line to reach your desired total percentage exposure.
PasswordForWebhook
{{strategy.order.action}} BTCUSD q=10 qt=percent slp=40000 tp=1000
Split market orders with TradingView Link
You can send multiple market orders in a single alert by placing each instruction on a new line under the same password, which is useful for scaling into positions.
PasswordForWebhook
short BTCUSD q=0.1 sl=800 tp=1000
short BTCUSD q=0.2 sl=800 tp=1000
Close trades with `flat` action
The `flat` action closes all open positions for the specified symbol, even if quantity or other parameters are included on the line.
PasswordForWebhook
flat US500
Section 2 – Limit orders via TradingView Link
To open a limit order, send the password followed by an instruction that includes action, symbol, q=, and a limit price parameter p= using price, pips, or percentage.
On MT5, positive point offsets are not always allowed for some limit configurations, so negative values such as p=-3000 indicate a price offset below or above the market depending on order direction.
PasswordForWebhook
long BTCUSD q=0.1 p=-3000 tp=5%
Use e= to add an expiry time in minutes, after which pending limit orders that remain unfilled will be cancelled.
PasswordForWebhook
short BTCUSD q=0.1 p=-300 tp=1000 e=15
To cancel all pending limits on a symbol, send a `cancel Symbol` instruction, and optionally refine it with `t=long` or `t=short` to cancel long‑only or short‑only pending orders.
PasswordForWebhook
cancel BTCUSD t=long
Magic numbers and multi‑strategy trading
Add m= to tag each order with a magic number so that multiple strategies can trade the same symbol without interfering with one another’s positions.
PasswordForWebhook
long BTCUSD q=0.1 sl=300 tp=600 m=1001
Partial closes and emergency exits with `cq=`
Use cq= with a `flat` action to partially close a given percentage of all open lots.
PasswordForWebhook
flat BTCUSD cq=30%
Reference for Partial Close Strategy: https://www.tradingview.com/script/neSv81fQ-partial-close-sample/
Modify TP/SL and breakeven positions
Use `modify Symbol sl=... tp=...` to adjust TP/SL on existing positions, including special values like sl=-1 for breakeven or sl=-2 to remove the stop.
PasswordForWebhook
modify BTCUSD sl=-1 tp=3%
PasswordForWebhook
modify BTCUSD sl=-2
Trailing Stop functionality
Automatically adjust your stop loss as the market moves in your favor, measured in pips.
PasswordForWebhook
long EURUSD q=0.1 ts=1000
Trading Sessions control
Define specific time windows, and optionally days, during which the trade should be active. The time zone follows your broker's server time. Days are numbered 1-7 (Monday-Sunday).
PasswordForWebhook
short NAS100 q=0.1 s=14:30-19:00
PasswordForWebhook
short NAS100 q=0.1 s=5=14:30-15:00
PasswordForWebhook
short NAS100 q=0.1 s=14:30-15:00,15:30-16:15
PasswordForWebhook
short NAS100 q=0.1 s=5=14:30-15:00,15:30-16:15
PasswordForWebhook
short NAS100 q=0.2 s=3=14:30-15:00,3=15:30-17:00,5=15:30-17:00 sl=1000
Trading Range control
Define a specific price range for trade execution. Trades will only be placed if the current market price falls within this specified range.
PasswordForWebhook
long BTCUSD q=0.1 r=91000-91300
Once the TradingView Link EA is attached to a chart, key parameters such as webhook ID, slippage, maximum trades per symbol, and pyramiding determine how each alert is translated into actual orders.
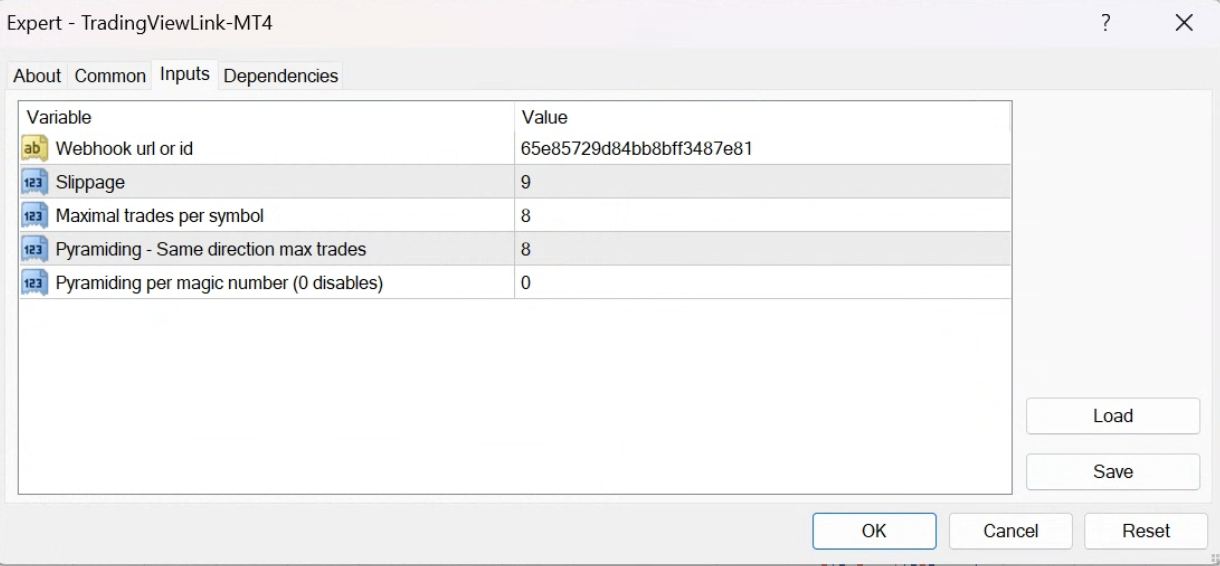
| Parameter | Description |
|---|---|
| Webhook ID | Stores the webhook identifier from the dashboard so the EA knows which incoming alerts belong to this trading account. The EA will ignore signals that are not associated with the configured webhook ID. |
| Slippage (points) | Sets the maximum allowed difference, in points, between the requested execution price and the actual fill price for market orders and related limit actions. Smaller values aim for tighter fills but can increase rejection rates, while larger values tolerate more price movement in fast markets. |
| Max trades per symbol | Limits how many additional trades the EA can open for any one symbol once this threshold has been reached, including pending limit orders. Helps cap exposure by preventing new trades on a symbol if the maximum number of existing and pending positions has already been reached. |
| Pyramiding (max positions) | Limits the total number of open positions allowed in the same direction for a given symbol across the entire MetaTrader account. For example, a setting of '3' means a maximum of three long or three short trades can be open for any single symbol. Once this limit is reached, no new positions (including market and pending limit orders) in that direction will be opened or activated. |
| Pyramiding per Magic Number (0 to disable) | When set to a value greater than 0, this parameter limits the number of open positions in the same direction for a symbol, specifically **per unique Magic Number (m)**. This acts as a sub-limit to the main 'Pyramiding (max positions)' setting, which always applies to the entire account. For example, if 'Pyramiding (max positions)' is set to 3, and 'Pyramiding per Magic Number' is set to 2, then each strategy (identified by its m) can open up to 2 positions of the same direction for a symbol, but the total number of same-direction positions for that symbol on the account cannot exceed 3. Setting this to 0 disables the per-Magic Number limit. |
Combining strict slippage with conservative maximum trades and pyramiding limits lets you keep the EA aligned with your risk policy even when TradingView sends frequent or overlapping signals.
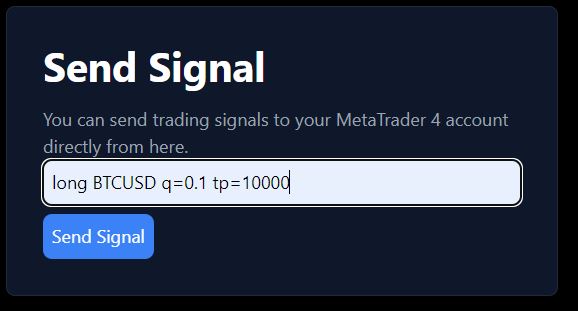
Send orders via webpage (Dashboard)
After the EA has been installed and is running on your MT4 or MT5 account, you can trigger trades directly from the TradingView Link dashboard without using TradingView alerts or Telegram.
These web‑initiated orders still go through the same EA logic and parameter constraints, keeping risk and execution behavior consistent across manual and automated flows.
Reverse Trade functionality
When a new signal arrives that is opposite to the current net position on a symbol, the EA can automatically close the existing trades and open a new position in the opposite direction.
For instance, if you hold three long BTCUSD positions and a short BTCUSD signal arrives, the EA closes all three longs first and then opens the configured short position.
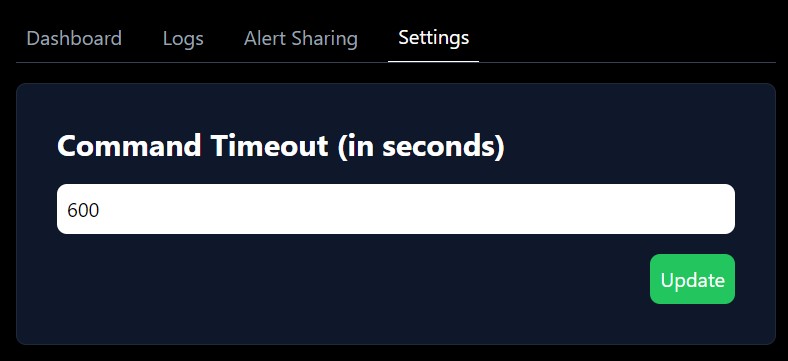
Timeout for Order Recovery
The timeout setting defines how long orders remain valid for execution after a disconnection, so alerts that reached the webhook shortly before or during the downtime can still be processed when the EA reconnects.
For example, with a timeout of 600 seconds, any unexecuted orders received within that period after reconnection will still be executed, as long as they fall within the configured time window.
- Confirm AutoTrading / Algo Trading button is green.
- Verify `https://tradingviewlink.com` is in WebRequest allowed URLs.
- Check that the webhook ID in the EA matches the webhook you are using in TradingView.
- Ensure the webhook password is on the first line of the alert message.
- Check that the symbol name in the message exactly matches the broker symbol (including suffixes).
- Review that action and quantity follow the syntax described above.
- Verify platform options allow WebRequest and DLL imports for the EA.
- Check firewall or VPS network rules that could block outbound connections from MT4/MT5.
- Ensure you sent `/setup WebhookID PasswordOfWebhookID` in the correct chat or group.
- If using groups, confirm the bot is added as administrator and the command is repeated in each group.
Do I need a separate EA per symbol in MetaTrader?
No. One TradingView Link EA instance per account, attached to a single chart, can trade all supported symbols for that account, as long as they are visible and active in Market Watch.
Can I run multiple webhooks on one MetaTrader account?
Yes. You can use multiple webhooks and strategies as long as they all map to the same account and EA instance via configuration, and optionally separate them with magic numbers in the alert messages.
Should I test on a demo account first?
Yes. Always test new symbol names, point/price offsets, TP/SL distances, and EA parameters on a demo account before going live with real capital in MetaTrader.